PS制作一个时尚网页文件夹图标(2)
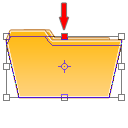
4. Then you duplicate the layer with the shape. Now you have to perspectively distort the new layer as shown on the picture:
4,然后复制一层.现在我们需要在新层上进行透视变换.(自由变换 -> 透视)

And now scale it down a little bit, so that it looks like an 3d opened folder:
然后把这里向下缩小一点,让它看起来像3D的打开文件夹.

The result of step 4:
第四步的效果如下:

5. In this step we're going to add a piece of paper. So make a new layer and draw a shape like the one on the picture:
5,这一步我们将制作一张纸.新建图层,画上如图的形状.

6. Now go to the layers palette and use the following settings:
Gradient Overlay:
Opacity: 10%
#000000 -> #FFFFFF
Angle: 50°
Stroke
Size: 1px
Position: Outside
Color: #D6D6D6
It should now look similar to this one:
6,接着将图层样式设置如下:
渐变叠加
不透明度:10%
渐变:#000000 -> #FFFFFF
角度:50°
描边
大小:1像素
位置:外部
颜色:#D6D6D6
现在看起来应该像这样:

学习 · 提示
相关教程


