photoshop图标制作:时钟
来源:未知
作者:空来风
学习:1288人次
作者fairy_huang 出处:Iconfans
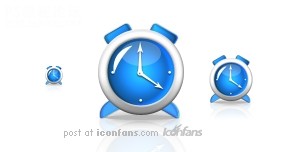
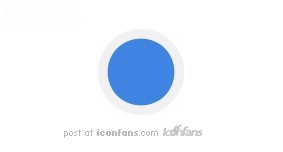
Step1 步骤1
We'll begin this tutorial, by creating a new canvas at a size of 283 x 152 then select the "Elipse Tool".
photoshop教程开始,从创建新文档开始,创建一个大小为283 x 152像素的新文档,然后选择“椭圆工具”
Draw a circle as illustrated using f1f1f1 as the color. Name this layer "Gray Circle".
画一个正圆(fairy插嘴:按住SHIFT可以创建正圆哦~),填充浅灰色,色值为“f1f1f1",将这个图层命名为”灰色正圆“(这个翻译得不太准,大家按照自己的喜好对图层命名好了)
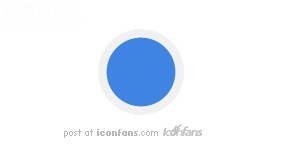
Step2 步骤2
Using the "Elipse Tool" once again draw a circle this time using 3f84e2 as the color. Name this layer "Blue Circle".
使用椭圆工具再画一个正圆,这次使用的填充颜色是蓝色咯,色值为”3f84e2"。同样的,将这个图层也进行命名。(我这里就直译了哈,叫做“蓝色正圆”)另外,fairy又要插嘴了,我是想告诉大家,这个蓝色圆和之前的灰色圆,圆心要重合哦~我的做法是直接复制了灰色圆,然后CTRL+T等比例缩放了一下……
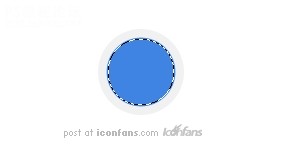
Step3 步骤3
Now"Ctrl" click the "Blue Circle" layer to create a selection around itand go to "Selection" then "Modify" and lastly "Contract" by 1.
现在我们载入图层2(就是那个蓝色正圆的图层)选区(具体方法是按住CTRL键点击需要载入选区的图层),然后在顶部菜单里点“选择”= “修改”= “收缩”,收缩量为1像素。
Step4 步骤4
Nowgo back to the "Grey Circle" layer and rasterize it by going to themain menu and selecting "Layer" then "Rasterize" and lastly "Shape".
在载入选区的状态下回到最初创建的那个图层,就是“灰色正圆”那个啦,在主菜单上点“图层”--“栅格化”--“形状”。
Next go to "Edit" and lastly "Cut" to rid the center of the "Grey Circle".
下一步到编辑菜单,最后选择“清除”,以消除中间部分的灰色圆。
Drag the "Blue Circle" so it is beneath the "Grey Circle" in the Layers Palette.
现在可以取消选区啦(快捷键CTRL+D),把之前的那个“蓝色正圆”的图层拖到“灰色图层”的下面。(嘻嘻……看到了吧,这样的话,时钟的外圈和内里就做出来了,下面继续细化)
Step5 步骤5
Now right click the "Grey Circle" layer and select, "Blending Options...". Now click on "Inner Glow".
现在双击“灰色正圆”图层,开始设置图层样式,首先是“内发光”。参数如下图所示:

Step6 步骤6
Now click on "Bevel and Emboss".
Step1 步骤1
We'll begin this tutorial, by creating a new canvas at a size of 283 x 152 then select the "Elipse Tool".
photoshop教程开始,从创建新文档开始,创建一个大小为283 x 152像素的新文档,然后选择“椭圆工具”
Draw a circle as illustrated using f1f1f1 as the color. Name this layer "Gray Circle".
画一个正圆(fairy插嘴:按住SHIFT可以创建正圆哦~),填充浅灰色,色值为“f1f1f1",将这个图层命名为”灰色正圆“(这个翻译得不太准,大家按照自己的喜好对图层命名好了)
Step2 步骤2
Using the "Elipse Tool" once again draw a circle this time using 3f84e2 as the color. Name this layer "Blue Circle".
使用椭圆工具再画一个正圆,这次使用的填充颜色是蓝色咯,色值为”3f84e2"。同样的,将这个图层也进行命名。(我这里就直译了哈,叫做“蓝色正圆”)另外,fairy又要插嘴了,我是想告诉大家,这个蓝色圆和之前的灰色圆,圆心要重合哦~我的做法是直接复制了灰色圆,然后CTRL+T等比例缩放了一下……
Step3 步骤3
Now"Ctrl" click the "Blue Circle" layer to create a selection around itand go to "Selection" then "Modify" and lastly "Contract" by 1.
现在我们载入图层2(就是那个蓝色正圆的图层)选区(具体方法是按住CTRL键点击需要载入选区的图层),然后在顶部菜单里点“选择”= “修改”= “收缩”,收缩量为1像素。
Step4 步骤4
Nowgo back to the "Grey Circle" layer and rasterize it by going to themain menu and selecting "Layer" then "Rasterize" and lastly "Shape".
在载入选区的状态下回到最初创建的那个图层,就是“灰色正圆”那个啦,在主菜单上点“图层”--“栅格化”--“形状”。
Next go to "Edit" and lastly "Cut" to rid the center of the "Grey Circle".
下一步到编辑菜单,最后选择“清除”,以消除中间部分的灰色圆。
Drag the "Blue Circle" so it is beneath the "Grey Circle" in the Layers Palette.
现在可以取消选区啦(快捷键CTRL+D),把之前的那个“蓝色正圆”的图层拖到“灰色图层”的下面。(嘻嘻……看到了吧,这样的话,时钟的外圈和内里就做出来了,下面继续细化)
Step5 步骤5
Now right click the "Grey Circle" layer and select, "Blending Options...". Now click on "Inner Glow".
现在双击“灰色正圆”图层,开始设置图层样式,首先是“内发光”。参数如下图所示:
Step6 步骤6
Now click on "Bevel and Emboss".
学习 · 提示
相关教程
关注大神微博加入>>


网友求助,请回答!