mel语初解之一-基础和界面篇(4)
关于表单布局,再举两个例子:
-----------------------------------------
// 这是一种常用的按钮摆放方法
global proc myTest()
{
if(`window -ex myTestWin`) deleteUI myTestWin;
window -t "表单布局1(formLayout)测试窗" myTestWin;
string $form = `formLayout -numberOfDivisions 3`; // 分3份
// "-horizontalScrollBarThickness 0"无横向滚动条
string $scroll = `scrollLayout -horizontalScrollBarThickness 0`;
columnLayout;
button; button; button;button; button;
button; button; button;button; button;
setParent ..;
setParent ..;
string $sep = `separator`;
string $b1 = `button -label "按钮1"`;
string $b2 = `button -label "按钮2"`;
string $b3 = `button -label "按钮3"`;
formLayout -edit
// 滚动布局
-attachForm $scroll "top" 4 // 顶部距离表单4个像素
-attachForm $scroll "left" 4 // 左边距离表单4个像素
-attachControl $scroll "bottom" 4 $sep // 底部距离"分隔线"4个像素
-attachForm $scroll "right" 4 // 右边距离表单4个像素
// 分隔线
-attachNone $sep "top" // 顶部为默认值
-attachForm $sep "left" 2 // 左边距离表单2个像素
-attachControl $sep "bottom" 4 $b1 // 底部距离"按钮1"4个像素
-attachForm $sep "right" 2 // 右边距离表单2个像素
// 按钮1
-attachNone $b1 "top" // 顶部为默认值
-attachForm $b1 "left" 4 // 左边距离表单4个像素
-attachForm $b1 "bottom" 4 // 底部距离表单4个像素
-attachPosition $b1 "right" 2 1 // 右边距离表单的1/3处2个像素
// 按钮2
-attachNone $b2 "top" // 顶部为默认值
-attachControl $b2 "left" 4 $b1 // 左边距离"按钮1"表单4个像素
-attachForm $b2 "bottom" 4 // 底部距离表单4个像素
-attachPosition $b2 "right" 2 2 // 右边距离表单的2/3处2个像素
// 按钮3
-attachNone $b3 "top" // 顶部为默认值
-attachControl $b3 "left" 4 $b2 // 左边距离"按钮2"4个像素
-attachForm $b3 "bottom" 4 // 底部距离表单4个像素
-attachForm $b3 "right" 4 // 右边距离表单4个像素
$form;
showWindow myTestWin;
}
myTest;

-----------------------------------------
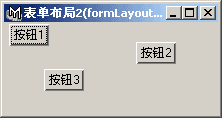
// 随意摆放控件的位置
global proc myTest()
{
if(`window -ex myTestWin`) deleteUI myTestWin;
window -t "表单布局2(formLayout)测试窗" myTestWin;
string $form = `formLayout`;
string $b1 = `button -l "按钮1"`;
string $b2 = `button -l "按钮2"`;
string $b3 = `button -l "按钮3"`;
formLayout -e
-af $b1 "top" 1
-af $b1 "left" 5
-af $b2 "top" 19
-af $b2 "left" 132
-af $b3 "top" 46
-af $b3 "left" 40
$form;
showWindow myTestWin;
}
myTest;
"rowLayout"命令 (横布局)
横布局与横竖布局有些相似,只不过控件只能横着摆而已。
-----------------------------------------
window;
rowLayout -numberOfColumns 3
-columnWidth3 80 75 150
-adjustableColumn 2
-columnAlign 1 "right"
-columnAttach 1 "both" 0
-columnAttach 2 "both" 0
-columnAttach 3 "both" 0;
text;
intField;
intSlider;
showWindow;
-----------------------------------------
"gridLayout"命令 (格子布局)
格子布局与横竖布局有些相似,受格子的影响,每个的控件大小相同。
-----------------------------------------
window;
gridLayout -numberOfColumns 2 -cellWidthHeight 50 50;
button; button; button; button;
button; button; button;
showWindow;
-----------------------------------------
"menuBarLayout"命令 (菜单条布局)
用于一个窗口放多个菜单条的情况。
-----------------------------------------
string $window = `window`;
columnLayout -adjustableColumn true;
// Create first menu bar layout.
string $menuBarLayout = `menuBarLayout`;
menu -label "File";
menuItem -label "New";
menuItem -label "Open";
menuItem -label "Close";
menu -label "Help" -helpMenu true;
menuItem -label "About...";
columnLayout;
button -label "Add Menu"
-command ("menu -parent " + $menuBarLayout + "; menuItem");
setParent ..;
setParent ..;
separator -height 10 -style "none";
// Create a second menu bar layout.
//
menuBarLayout;
menu -label "Edit";
menuItem -label "Cut";
menuItem -label "Copy";
menuItem -label "Paste";
menu -label "View";
menuItem -label "Fonts...";
menuItem -label "Colors...";
columnLayout;
text -label "Add some controls here.";
setParent ..;
setParent ..;
showWindow $window;
-----------------------------------------
"shelfLayout"命令 (工具架布局)
放置shelf按钮的布局,支持鼠标中键拖放代码。
-----------------------------------------
window;
tabLayout;
shelfLayout Anim;
setParent ..;
shelfLayout Render;
setParent ..;
shelfLayout Misc;
setParent ..;
showWindow;
-----------------------------------------
"shelfTabLayout"命令 (工具架标签布局)
-----------------------------------------
可以使工具架上多一个垃圾桶图标,以便删除不用的shelf按钮。
window;
shelfTabLayout
-image "smallTrash.xpm"
-imageVisible true mainShelfTab;
shelfLayout Dynamics;
setParent ..;
shelfLayout Rendering;
setParent ..;
shelfLayout Animation;
setParent ..;
showWindow;

共有的标志(一):
如果你读过mel命令的帮助文档,你会发现所有的界面命令都具有一些共同的标志。比如,"-q"、"-e"就是所有界面命令都具有的标志。我把这些标志介绍一下,这样无论任何界面(布局或控件)命令,只要用到这些标志时,你们就都知道怎么去用了。
"-q/-query"(查询)
表示查询的意思,你可以通过它获得某一标志的数值。(前面讲过了)
"-e/-edit"(编辑)
表示编辑的意思,你可以通过它修改某一标志的数值。(前面讲过了)
"-ex/exists"(是否存在)
通过"-ex"可以得知一个界面元素是否存在。
例如前面讲过的"if(`window -ex myTestWin`)"。
"-dt/defineTemplate" (定义模板)
"-ut/useTemplate" (使用模板)
一般我们没必要定义模板,不过有几个Maya已经定义好的模板有时会用到,我以后再讲。
"-p/parent" (指定父级界面元素)
指定父级界面元素(布局或菜单),平常我们用"setParent"命令来解决这个问题,所以"-p"很少用到。
"-en/enable" (是否激活)
我们经常看到一些菜单或按钮上的字是灰色的,表示它们现在不能用。
使用"-en"就可以让你的界面元素上的字变灰,使它们不能用。
例如"button -e -en off myButton1"就是让按钮myButton1变得不能用。
而"button -e -en on myButton1"就是让按钮myButton1恢复活力。
"-w/width" (宽度)
界面元素的宽度为多少像素。
你会发现使用这个标志时经常不起作用。
比如如果在布局命令中指定了里面控件的宽度,再给布局中这些控件指定宽度就不起作用了。
窗口的宽度只在第一次创建时有用,以后创建会使用预置中的尺寸。预置中的尺寸就是窗口关闭时的大小,这个尺寸记录在预置文件(windowPrefs.mel)中,可以通过"windowPref"命令去除窗口的预置尺寸,方法是"windowPref -remove 窗口名;"
"-h/height" (高度)
界面元素的高度为多少像素。
用法同"-w/width",例如"button -w 32 -h 32;"。
"-vis/visible" (是否可见)
指定界面元素是否可见。
前面讲过"window -visible off"的问题。其它界面元素也可以通过"-visible off"暂时隐藏,想要显示出来,就用"-visible on"。
"-io/isObscured" (是否看不到)
查询界面元素是否不可见。你肯定会问"-io"和"-vis"的区别。"-io"只能用于查询(-q)模式,般查询结果正好与"-vis"的查询结果相反。不过"-io"的不可见包括窗口最小化、父级界面元素隐藏等造成的不可见因素。
"-m/manage" (可控制)
指定界面元素是否可见。跟"-vis"没什么区别。
"-ann/annotation" (注释)
给界面元素注释。注释可以在帮助栏显示,也可以让鼠标在界面元素上停一会,在弹出式的淡黄底色注释条看到。
"-bgc/backgroundColor" (底色)
要想编写彩色窗口就要用到这个标志。
还有一些共有标志留到以后讲。
布局到此已经全讲完了,接下来讲控件。
前面提到过一些控件:
"text"命令 (静态文本)
"textField"命令 (文本框)
"button"命令 (按钮)
"separator"命令 (分隔线)
这些控件虽然已经讲过了,但由于十分重要,现在在强调一下,一定要熟练掌握。
另外,先随便讲几个:
"picture"命令 (图片)
静态图片。
---------------------------------------------------
picture -w 80 -h 60 -image "sphere.xpm" -tile on;
---------------------------------------------------
"-i/image"指定图片。
"-tl/tile"指定图片是否重复排叠显示。

"iconTextButton"命令 (图标文本按钮)
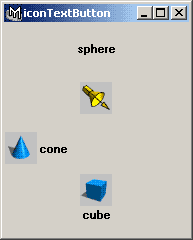
既有字又有图标的按钮,你可以只显示字或图标。
---------------------------------------------------
string $window = `window`;
columnLayout -adj 1;
iconTextButton -style "textOnly"
-image1 "sphere.xpm" -label "sphere";
iconTextButton -style "iconOnly"
-image1 "spotlight.xpm" -label "spotlight";
iconTextButton -style "iconAndTextHorizontal"
-image1 "cone.xpm" -label "cone";
iconTextButton -style "iconAndTextVertical"
-image1 "cube.xpm" -label "cube";
showWindow $window;
"symbolButton"命令 (符号按钮)
有图片的按钮。
---------------------------------------------------
symbolButton -image "cone.xpm" -c "cone";
---------------------------------------------------

"intSlider"命令 (整数型滑动条)
---------------------------------------------------
intSlider -min -100 -max 100 -value 0;
---------------------------------------------------
"-min"最小值
"-max"最大值
"-value"当前值

一直这么讲下去难免有些枯燥乏味,还是来点实战轻松一下吧。
下面介绍一下赌牌游戏myFourUp的编写方法。
------------------------------
实例7:赌牌游戏myFourUp
myFourUp程序很像一个扑克机,它的原版是Stephen D. Gilbert的Visual C++ 6编程蓝皮书中的一个实例(FourUp),我认为这个程序用于Mel也同样很能说明问题,就擅自把它移植了过来,不过我在界面和算法部分都作了较大改动。
说到打赌,myFourUp程序与拉斯韦加斯和亚特兰大城中赌场工作人员特别喜爱的扑克游戏相似。但myFourUp更简单,因此你可以集中精力学习程序设计和界面编写方法。
myFourUp并非技巧游戏。当游戏开始时,给玩者1000美元。每一轮(需花一定赌注,比如2美元)玩者接到4张牌。牌值无关紧要-我们关心的只是花色。如果玩者得到两对(例如,两张红心和两张方片),将得4美元。如果玩者得到三个单张,将得到6美元。如果发牌者摆出四张同一花色,将得8美元。
当然,游戏并非使用真钱。如果你想编写程序以便能拨入玩者的银行帐户来取出赢利(或弥补亏空),那是你自己的事。
在我们编写代码之前,让我们先花一点时间来计划一下程序的外观以及它将如何工作。最好是用纸和笔画出该布局,毕竟修订一个计划比改变一个完成的程序要容易。
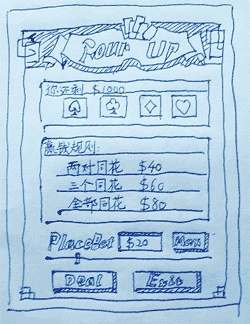
现在可以根据草图来编写代码,不过编写代码之前最好先讲一下什么是全局变量。
全局变量(Global Variable)
我们以前用到的变量都是局部变量。局部变量只能在函数里面用,当函数运行时局部变量被创建,函数运行结束后,局部变量就被删除了。
如果用户需要在一个函数中创建的变量,其它的函数也可用,则用户可以通过全局变量来实现。如果你创建了一个全局变量,你可以通过函数,也可以通过命令行不断修改它的值。全局变量将一直保留在内存中,直到你退出Maya时才会被删除。
在变量声明前加上"global"表示为全局变量。(在命令行声明全局变量可以不写"global")
例如:
global float $counter;
跟椐Maya帮助文档的说法应当尽量少用全局变量,否则很容易会因为粗心而出错。比如你声明了一个全局变量$counter,而Maya中却碰巧已经有了一个全局变量$counter,此时你对$counter变量值所作的任何修改都将影响以前就存在的全局变量$counter,这将会产生错误。
为避免碰巧同名变量的存在,请用较为独特的名称来命名全局变量。Maya中的全局变量都是以小写字母"g"开头(例如$gMainWindow),你可以用除"g"以外的你喜欢的字母开头,本教程中用到的全局变量一般都以"mg"开头。
下面开始我们的程序。程序虽然简单,但这个是一个完善的游戏程序,对于某些初学者来说可能有些难度,如果你实在看不懂,就索性照抄一遍,借此体验一个编程的感觉。
在myFourUp程序中,用一个全局变量$mgMoneyRemaining来记录你拥有的总钱数,当你赢钱时总钱数会增加,反之则会减少。
----------------------------------
//global proc myFourUp(){以下的代码写在括号中}
// 初始化总钱数为1000美元
global int $mgMoneyRemaining;
$mgMoneyRemaining = 1000;
界面代码:
首先创建窗口:
----------------------------------
if(`window -ex myFourUpWin`) deleteUI myFourUpWin;
window -t "Four Up"
-widthHeight 293 440
-sizeable false
myFourUpWin;
----------------------------------
"-wh/widthHeight"指定窗口的长度和宽度分别为多少像素。也可用"-w"和"-h"分别来指定。
"-s/sizeable"指定窗口是否可以拉大缩小(变化尺寸)。
为了能够随意摆放控件,用一个表单布局作为窗口的主布局。
----------------------------------
string $form = `formLayout -backgroundColor 0.353 0.353 0.259`;
----------------------------------
创建布局$form中的元素:
----------------------------------
// 标题图片
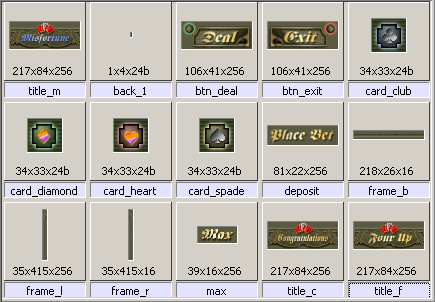
string $pTitle_f = `picture -image "title_f.bmp" fourUpTitle`;
// 边框图片
string $pFrame_l = `picture -image "frame_l.bmp"`;
string $pFrame_r = `picture -image "frame_r.bmp"`;
string $pFrame_b = `picture -image "frame_b.bmp"`;
// 位图按钮(图标文本按钮)
string $bBtn_1 = `iconTextButton -style "iconOnly"
-backgroundColor 0.353 0.353 0.259
-w 106 -h 41 -image1 "btn_deal.bmp"
-c "dealCards"`;
string $bBtn_2 = `iconTextButton -style "iconOnly"
-backgroundColor 0.353 0.353 0.259
-w 106 -h 41 -image1 "btn_Exit.bmp"
-c "deleteUI myFourUpWin;"`;
// 横布局
// 包括一个静态图片,一个文本框和一个符号按钮
string $row = `rowLayout -numberOfColumns 3
-backgroundColor 0.353 0.353 0.259
-columnWidth3 82 60 80`;
picture -image "deposit.bmp";
textField -ed false -tx "$2" placeBetField;
symbolButton -image "max.bmp" -c "placeBetMax";
setParent ..;
// 整数型滑动条
string $slider = `intSlider
-backgroundColor 0.568 0.588 0.463
-min 2 -max 100 -value 2 -step 20
-dragCommand "placeBet" placeBetSlider`;
// 两个边框布局
string $frame_1 = `frameLayout -backgroundColor 0.863 0.729 0.435
-label "你还剩:$1000 "
-labelAlign "bottom" -borderStyle "etchedIn"
-h 65 MoneyRemainingFrame`;
// @@@A 创建布局$frame_1中元素的代码写在这里:
setParent ..;
string $frame_2 = `frameLayout -backgroundColor 0.863 0.729 0.435
-label "赢钱规则:"
-labelAlign "bottom" -borderStyle "etchedIn"
-h 110`;
// @@@B 创建布局$frame_2中元素的代码写在这里:
setParent ..;
----------------------------------
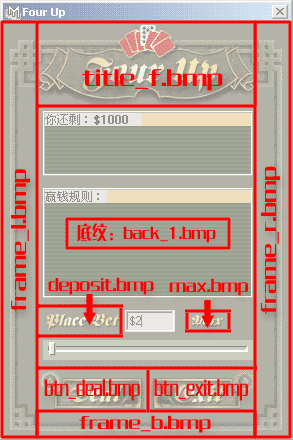
指定布局$form中每个界面元素的位置,
注意每张图片所放置的位置。
----------------------------------
formLayout -e
// frame_l.bmp直接放在布局$form的左上角
-af $pFrame_l "top" 0
-af $pFrame_l "left" 0
// title_f.bmp
-af $pTitle_f "top" 0 // 上边紧靠布局的上边
-ac $pTitle_f "left" 0 $pFrame_l // 左边紧靠frame_l.bmp
// frame_r.bmp
-af $pFrame_r "top" 0 // 上边紧靠布局的上边
-ac $pFrame_r "left" 0 $pTitle_f // 左边紧靠title_f.bmp
// frame_b.bmp
-af $pFrame_b "bottom" 0 // 底边紧靠布局的底边
-ac $pFrame_b "left" 0 $pFrame_l // 左边紧靠frame_l.bmp
-ac $frame_1 "top" 5 $pTitle_f
-ac $frame_1 "left" 5 $pFrame_l
-ac $frame_1 "right" 2 $pFrame_r
-ac $frame_2 "top" 12 $frame_1
-ac $frame_2 "left" 5 $pFrame_l
-ac $frame_2 "right" 2 $pFrame_r
-ac $row "top" 12 $frame_2
-ac $row "left" 5 $pFrame_l
-ac $slider "top" 8 $row
-ac $slider "left" 5 $pFrame_l
-ac $slider "right" 2 $pFrame_r
// btn_deal.bmp
-ac $bBtn_1 "bottom" 0 $pFrame_b // 底边紧靠frame_b.bmp
-ac $bBtn_1 "left" 0 $pFrame_l // 左边紧靠frame_l.bmp
// btn_exit.bmp
-ac $bBtn_2 "bottom" 0 $pFrame_b // 底边紧靠frame_b.bmp
-ac $bBtn_2 "right" 0 $pFrame_r // 右边紧靠frame_r.bmp
$form;
----------------------------------
显示窗口:
----------------------------------
showWindow myFourUpWin;
----------------------------------
界面和主要部分编好了,下面让我们来填补两个边框布局。
在前面代码的"@@@A..."这句注释之后填写如下代码:
----------------------------------
// 布局$form_1中的布局分两层
string $form_1 = `formLayout`;
// 先写的为第一层,第一层放置底纹图片"back_1.bmp"
// "-tl"图片重叠摆放
string $pBack_1 = `picture -tl 1 -image "back_1.bmp"`;
// 放置四种花色图片
// spade - 黑桃,club - 梅花,diamond - 方片,heart - 红心。
string $card_s = `picture -image "card_spade.bmp" cardImg_0`;
string $card_c = `picture -image "card_club.bmp" cardImg_1`;
string $card_d = `picture -image "card_diamond.bmp" cardImg_2`;
string $card_h = `picture -image "card_heart.bmp" cardImg_3`;
// 指定位置
formLayout -e
-af $pBack_1 "top" 0
-af $pBack_1 "bottom" 0
-af $pBack_1 "left" 0
-af $pBack_1 "right" 0
-af $card_s "top" 6
-ap $card_s "left" 8 0
-af $card_c "top" 6
-ap $card_c "left" 8 25
-af $card_d "top" 6
-ap $card_d "left" 8 50
-af $card_h "top" 6
-ap $card_h "left" 8 75
$form_1;
setParent ..;

布局$form_2编写的方法类似布局$form_1,我就不做解释了。
在"@@@B..."这句注释之后填写如下代码:
----------------------------------
string $form_2 = `formLayout`;
string $pBack_2 = `picture -tl 1 -image "back_1.bmp"`;
string $pT1 = `text -l " 两对同花 $4"
-backgroundColor 0.568 0.588 0.463 placeBetText1`;
string $pT2 = `text -l " 三个同花 $6"
-backgroundColor 0.568 0.588 0.463 placeBetText2`;
string $pT3 = `text -l " 全部同花 $8"
-backgroundColor 0.568 0.588 0.463 placeBetText3`;
formLayout -e
-af $pBack_2 "top" 0
-af $pBack_2 "bottom" 0
-af $pBack_2 "left" 0
-af $pBack_2 "right" 0
-ap $pT1 "top" 10 0
-af $pT1 "left" 15
-af $pT1 "right" 15
-ap $pT2 "top" 10 30
-af $pT2 "left" 15
-af $pT2 "right" 15
-ap $pT3 "top" 10 60
-af $pT3 "left" 15
-af $pT3 "right" 15
$form_2;
// 因为$form_2之后不再创建界面元素了,所以可以不写"setParent ..;"
界面部分编完了,现在来编写代码让这个游戏运转起来。
在前面的代码中,有三处需要调用自定义的命令,分别是:
1)位图按钮(btn_deal.bmp)。
string $bBtn_1 = `iconTextButton ... -c "dealCards"`;
2)"-dragCommand"拉动滑动条时执行的命令。
string $slider = `intSlider ... -dragCommand "placeBet" placeBetSlider`;
3)横布局中的符号按钮(max.bmp)。
symbolButton ... -c "placeBetMax";
// 按下"Max"(max.bmp)按钮执行的命令
global proc placeBetMax()
{
// 把滑动条拨到最右边
intSlider -e -v 100 placeBetSlider;
// 文本框中填入相应的值$100
textField -e -tx "$100" placeBetField;
// 修改赢钱规则
text -e -l (" 两对同花 $200") placeBetText1;
text -e -l (" 三个同花 $300") placeBetText2;
text -e -l (" 全部同花 $400") placeBetText3;
}
// 拉动滑动条时执行的命令
global proc placeBet()
{
// 获得滑动条上的数值
int $deposit = `intSlider -q -v placeBetSlider`;
// 文本框中填入滑动条的数值
string $text = "$" + $deposit;
textField -e -tx $text placeBetField;
// 修改赢钱规则
int $m1 = $deposit * 2;
int $m2 = $deposit * 3;
int $m3 = $deposit * 4;
text -e -l (" 两对同花 $" + $m1) placeBetText1;
text -e -l (" 三个同花 $" + $m2) placeBetText2;
text -e -l (" 全部同花 $" + $m3) placeBetText3;
}
现在来对付关键部分,相对比较复杂。
我们可以先来考虑一下,当玩家点击了"deal"按钮时,我们希望发生什么?
1)随机选择4张牌作为一付牌。
2)更新每张牌的图像以指示该付牌的花色。
3)统计每种花色牌的张数。
4)统计同种花色的牌一共有几对。
5)从总钱数扣去赌注。
6)计算输赢,如果赢钱加入总钱数中。
7)赢钱后加亮赢钱规则字样的底色。
8)修改标题图片,如果是赢钱显示"Congratulations",否则显示"Misfortune"。
8)显示剩余金额。
----------------------------------
// 位图按钮(btn_deal.bmp)命令
global proc dealCards()
{
global int $mgMoneyRemaining;
// 分别用四个变量记录每种花色牌的张数
int $num_spade = 0;
int $num_club = 0;
int $num_diamond = 0;
int $num_heart = 0;
// 用$pairs记录同种花色的牌一共有几对
int $pairs = 0;
for($i=0; $i<4; $i++)
{
// 随机选择4张牌中的一张
int $num = `rand 4`;
if($num == 0) {
// 更新花色牌的图片
picture -e -image "card_spade.bmp" ("cardImg_"+$i);
// 统计每种花色牌的张数
$num_spade++; // $num_spade = $num_spade + 1
}
if($num == 1) {
picture -e -image "card_club.bmp" ("cardImg_"+$i);
$num_club++;
}
if($num == 2) {
picture -e -image "card_diamond.bmp" ("cardImg_"+$i);
$num_diamond++;
}
if($num == 3) {
picture -e -image "card_heart.bmp" ("cardImg_"+$i);
$num_heart++;
}
}
// 统计同种花色的牌一共有几对
if($num_spade == 2)
$pairs++;
if($num_club == 2)
$pairs++;
if($num_diamond == 2)
$pairs++;
if($num_heart == 2)
$pairs++;
//----------------------------------------------
// 从滑动条上得到赌注数额
$deposit = `intSlider -q -v placeBetSlider`;
int $m1 = $deposit * 2;
int $m2 = $deposit * 3;
int $m3 = $deposit * 4;
// 先用总钱数减去赌注
$mgMoneyRemaining -= $deposit;
// 调整文字,为的是保证文本框底色的刷新
text -e -l "" -backgroundColor 0.568 0.588 0.463 placeBetText1;
text -e -l "" -backgroundColor 0.568 0.588 0.463 placeBetText2;
text -e -l "" -backgroundColor 0.568 0.588 0.463 placeBetText3;
// 修改标题图片为"Misfortune"
picture -e -image "title_m.bmp" fourUpTitle;
// 两对同花
if($pairs == 2) {
// 赢的钱加入总钱数中
$mgMoneyRemaining += $m1;
// 加亮文本底色,变为亮黄色
text -e -backgroundColor 1 1 0.463 placeBetText1;
// 修改标题图片为"Congratulations"
picture -e -image "title_c.bmp" fourUpTitle;
}
// 三个同花
if( $num_spade == 3 || $num_club == 3 ||
$num_diamond == 3 || $num_heart == 3 ) {
$mgMoneyRemaining += $m2;
text -e -backgroundColor 1 1 0.463 placeBetText2;
picture -e -image "title_c.bmp" fourUpTitle;
}
// 全部同花
if( $num_spade == 4 || $num_club == 4 ||
$num_diamond == 4 || $num_heart == 4 ) {
$mgMoneyRemaining += $m3;
text -e -backgroundColor 1 1 0.463 placeBetText3;
picture -e -image "title_c.bmp" fourUpTitle;
}
// 刷新
text -e -l (" 两对同花 $" + $m1) placeBetText1;
text -e -l (" 三个同花 $" + $m2) placeBetText2;
text -e -l (" 全部同花 $" + $m3) placeBetText3;
// 显示剩余金额
frameLayout -e -label ("你还剩:$" + $mgMoneyRemaining) MoneyRemainingFrame;
}
全部代码编写完毕,现在你可以体验赌牌的乐趣了。

我把全部范例代码和图片放到附件中,供你们参考。
 1515133-myFourUp.rar (56.52k)
"if"语句 (如果)
关于"if"语句以前讲的不够详细,现在做一点简要补充。小括号里的双竖线"||"表示"或"的意思,而"&&"表示"并且"的意思。
"if"后面的小括号里的代码表示的只能是一个布尔值,1或0。
因此要表示相等要写双等号。
"双等号的用法"
----------------------------------
int $test = 4;
int $bool = $test == 5; // 如果$test等于5,$bool = 1(true)
----------------------------------
这里因为$test = 4,不等于5,所以$bool = 0(false)。
"rand"命令 (随机)
前面用到"rand"命令,"rand"是随机的意思,就是从指定的范围内随便取出一个数值。mel里的"rand"同C语言的"rand"有一个很明显的差别,mel是浮点数的随机,C语言是整数的随机。
我在myFourUp程序中写的"int $num = `rand 4`;" 实际上是一种浮点数转整数的方法,还有一种写法更容易看明白一些:
float $floatNum = `rand 4`;
int $num = (int)$floatNum;
学习 · 提示
相关教程


